Angular Change Detection Cheat Sheet Explained
 Written by
Brecht Billiet
Written by
Brecht Billiet

A few weeks ago, we created this Free Angular Change Detection Cheat Sheet that we can use to help us when we are debugging complexities, chasing bugs, or when we simply design performance upgrades in our application:
After 24 hours my new #angular Change Detection Cheat Sheet was requested 245 times already. Thank you for being awesome and downloading it. I hope you all like it. Feedback is more than welcome and if you value cheat sheets like this and you have ideas for me ==> DM ME 🥰🥰
— Brecht Billiet👨💻 - Simplified Angular Courses (@brechtbilliet) October 25, 2022
The Angular Change Detection Cheat Sheet explained
Even though the Angular Change Detection Cheat Sheet should be self-explanatory. We love to give some information about it anyway. Also, take a look at the Angular performant drag-and-drop with RxJS article. We can apply the cheat sheet there and see if we grasp it. This article contains some screenshots of the cheat sheet, but if you want to have the original version you can get it here.
Get the free Angular Change Detection Cheat Sheet
If you want to print the Cheat Sheet and hang it in your office, send us an email or reach out on Twitter, and we can send you a version in printable quality!
This Cheat Sheet is divided into 2 blocks:
- What will mark a view with
LViewFlags.Dirty? - What triggers Change Detection?
The difference between this is key. LViewFlags.Dirty is only relevant when
the Change Detection Strategy is set to OnPush. Because that’s when knowledge about Change Detection becomes important.
If we are using the default strategy we don’t really have to know how Change Detection works, because all components will get checked every time.
This is of course bad for performance, but it will be predictable.
It’s when we use the OnPush strategy, that it becomes important that we know how Angular ticks.
The what triggers Change Detection section shows us how and when Change Detection will be triggered. This block is divided into 4 sub-blocks:
- Default Strategy: Shows how Change Detection works with the default strategy.
- OnPush Strategy on all components: Shows how Change Detection works when the
OnPushstrategy is applied to all components. - OnPush Strategy on all child components: Shows how Change Detection works when the
OnPushstrategy is applied on all components but the top-level components. - appRef.tick() when dirty marked views and OnPush strategy on child components: This shows how Change Detection works with the
OnPushstrategy is applied on all components but the top-level components, and when components are marked withLViewFlags.dirtyor not.
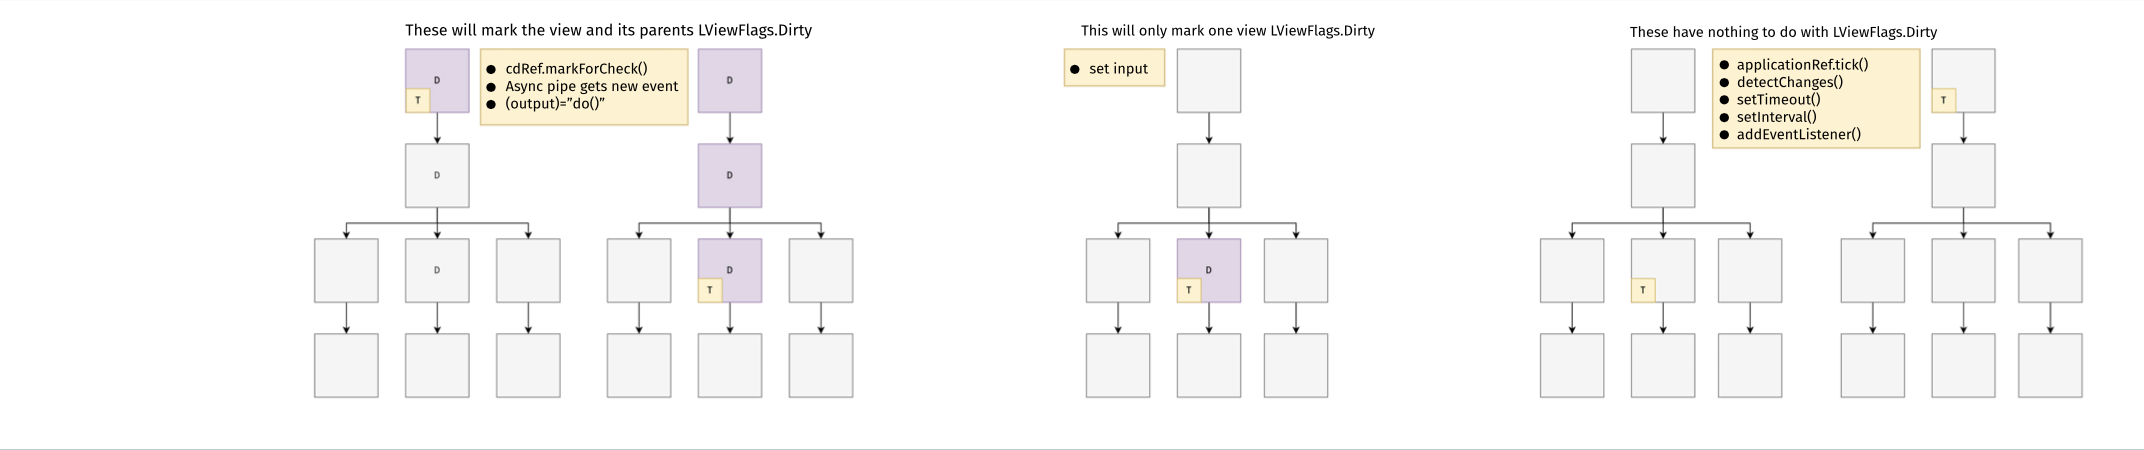
The first block: What will mark a view with LViewFlags.Dirty?
Here we have the following legend:
- D: Will be marked LViewFlags.Dirty
- T: Where it is triggered
We will see 3 examples here.
First example
The first example shows 2 triggers. One on the root component, and one somewhere in a child component. We can see 3 different triggers here in the yellow box. Yellow boxes show triggers everywhere in the Cheat Sheet:
cdRef.markForCheck()- async pipe
- Event binding
We can see that there is a difference in where those triggers occur. The 3 triggers will result in the same behavior, but we can see the difference in which components are marked dirty, based on where those triggers occur.
Second example
Here we can see that a set input by a parent component will only mark that view dirty and not its parents. This is different from the previous triggers.
Third example
In this example, we see that the 5 triggers in the yellow box will not mark anything dirty. It’s there to illustrate some common misconceptions. They trigger Change Detection but they don’t mark anything dirty.
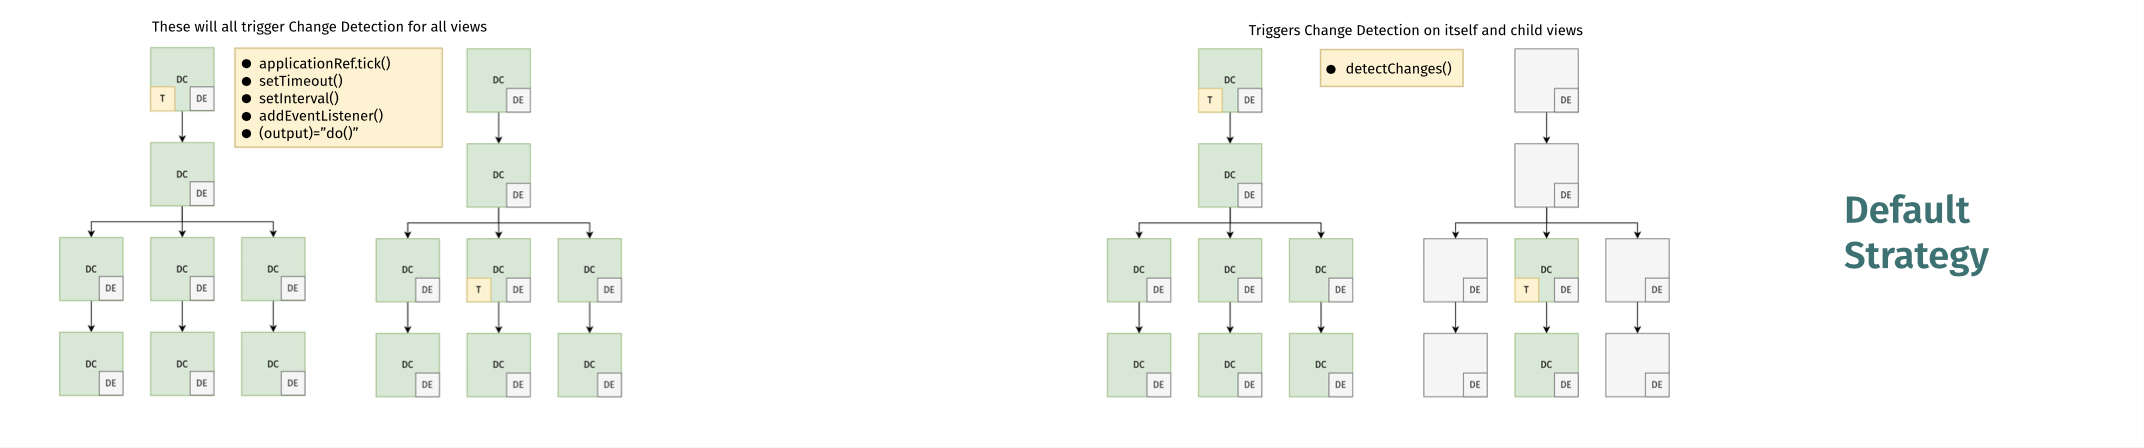
The second block: What triggers Change Detection?
Default strategy
In this block we want to show that when we use the default Change Detection Strategy, Change Detection will run always when:
- applicationRef.tick()
- any event is triggered
- an event is bound
In the second example, we want to show that detectChanges() always runs from top to bottom, so when we run it on the root component,
it will trigger change detection for all components and when we use it on a child component, change detection will run for that component and all its children.
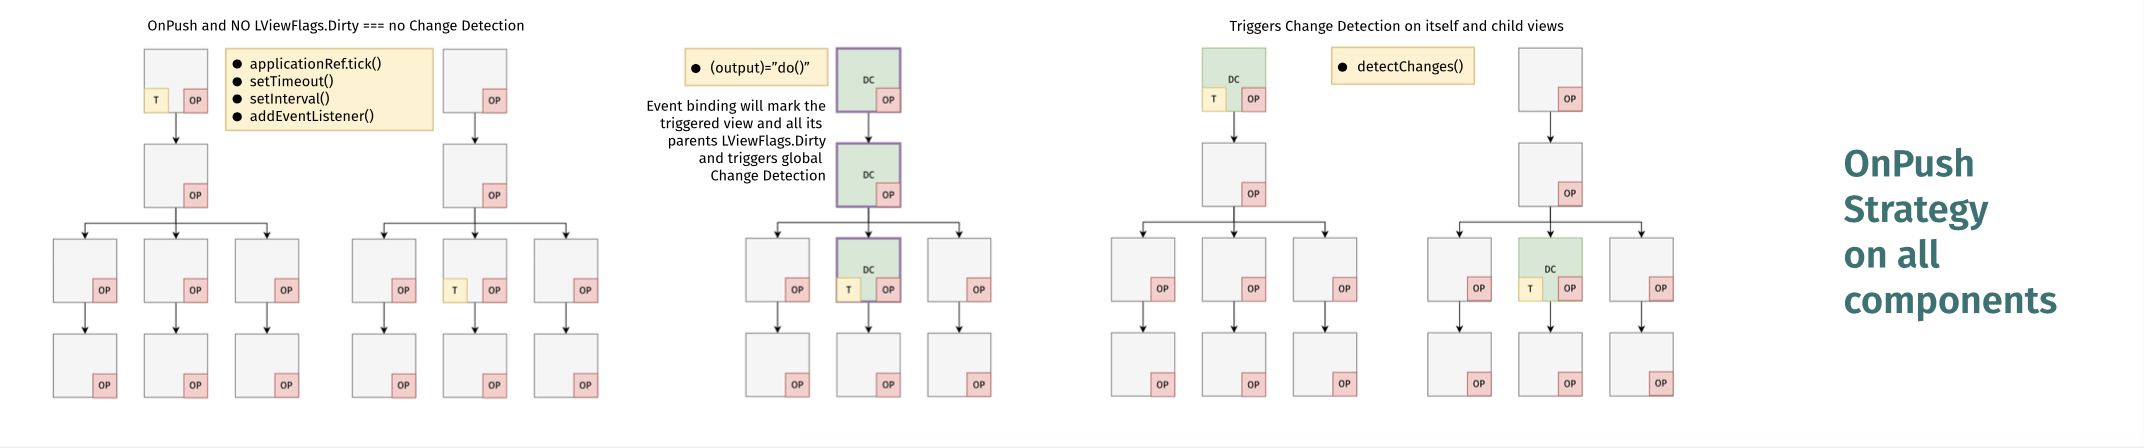
OnPush Strategy on all components
In this block, we want to show how Change Detection will run when OnPush is applied to all components
and the views aren’t marked with LViewFlags.dirty. We can see that Change Detection runs only on detectChanges() but
that it only runs for the component itself. We can also see that event binding will trigger change detection because behind the
scenes binding an event will mark the view dirty and all its parents as well.
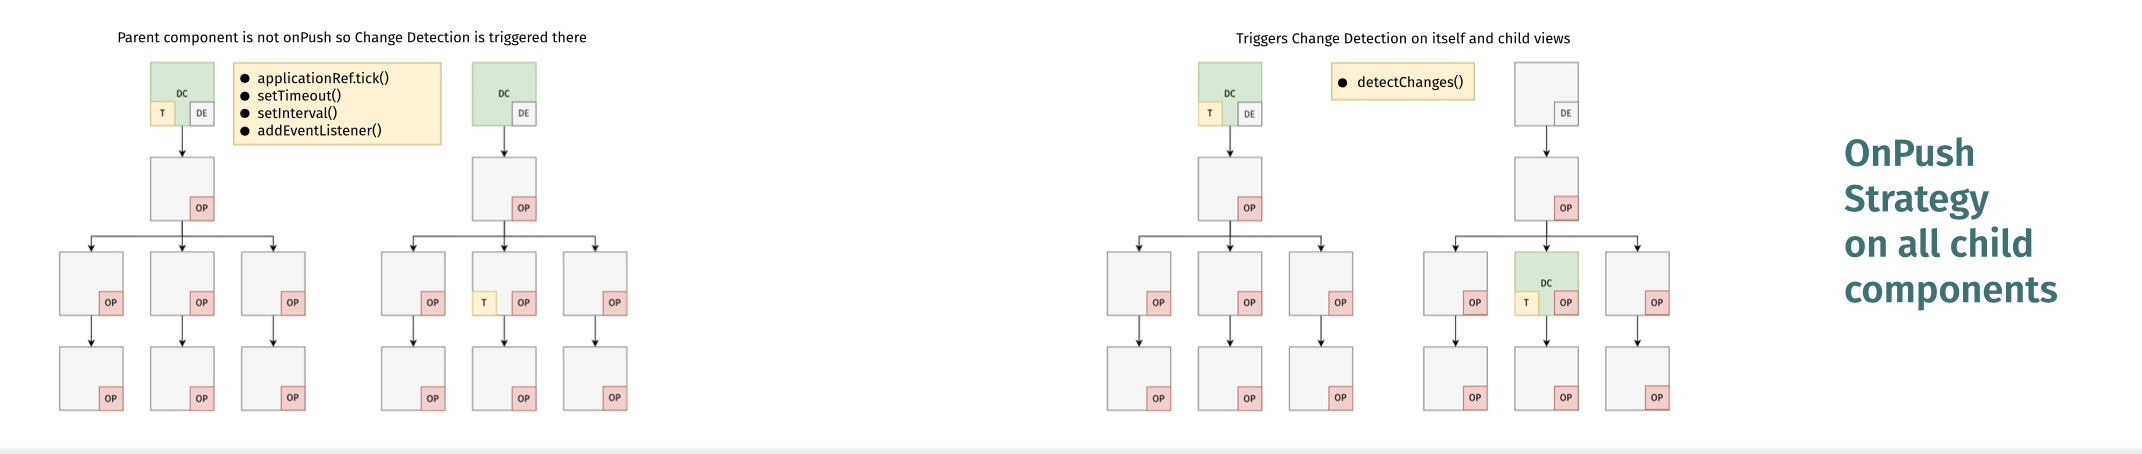
OnPush Strategy on all child components
Here we want to show that Change Detection will always run on the parent but not on the child components.
detectChanges() works exactly the same as before.
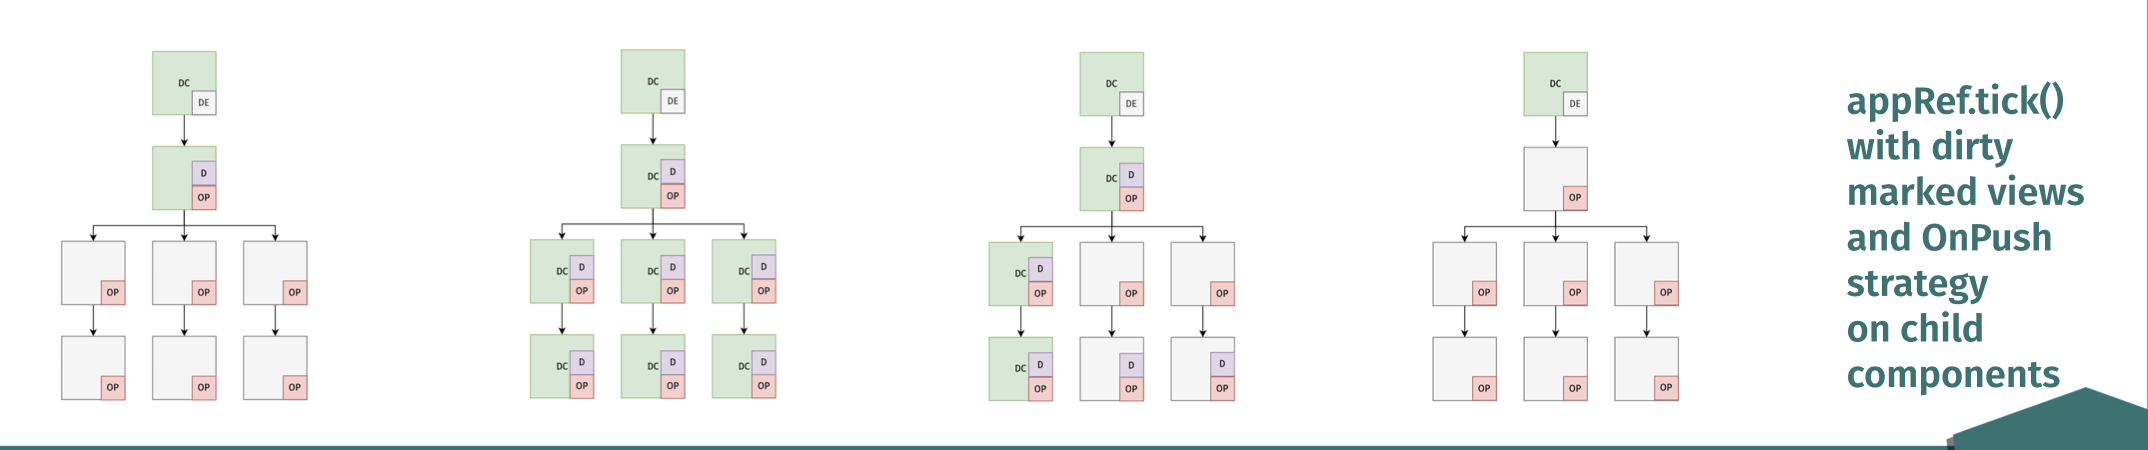
appRef.tick() with dirty marked views and OnPush strategy on child components
Here we visualize how the OnPush strategy will work when child components are marked with LViewFlags.dirty.
Here we can see the biggest performance optimization. This shows exactly how the
OnPush strategy can conditionally run Change Detection on only the views that need it.
Wrapping up
We hope this article will explain the Angular Change Detection Cheat Sheet and if you haven’t downloaded it already, you can do that here! Remember, if you want the fully printable version, just reach out to us! We love to see our work hanging in your awesome office!
Do you want to test your knowledge? I created a free Angular Change Detection Quiz that I explain in this video blog.
Ebook
If you are interested, we have also written an Ebook that explains Angular Change Detection in depth. It follows the actual process in the codebase and has references to the GitHub repo of Angular everywhere. If you read this, you will really learn how Angular ticks!
Get the ebook By clicking on the image below!

If you liked the article, please leave a comment!
If you like to learn directly from me, check out my Angular Training and Angular Coaching
Follow @TwitterDevJoin the club and get notified with new content
Get notified about our future blog articles by subscribing with the button below.
We won't send spam, unsubscribe whenever you want.

Update cookies preferences